Sunday, July 19, 2015

So little time, so much to accomplish.

Hi,
Hope everyone has survived this unbelievable humidity. I know it's to be expected this time of year, but it really kicks the stuffing out of me.  I was working on my patio, painting a chair for my living room, but it was way to hot for that. The Chalk paint was drying before I got it applied. So, I put that project away for a while and headed to the shop to continue on my projects for this week.

I'm having so much fun with glaze. The best part is that if you have a paint color that you just don't care for, it really can make a difference.  I have a can of OOPS paint that I picked up, it looked like a nice gray but really its a very light bluish gray. Finding out you don't like the color.... after you've painted a really nice chest with it,  isn't a good thing. That's where the glaze comes in. I use a dark brown tint, it tones colors down but doesn't take over.  To test it, I apply a light coat and wipe most of it off.  I have found that it's easier to work with and you have more control - if you start light.

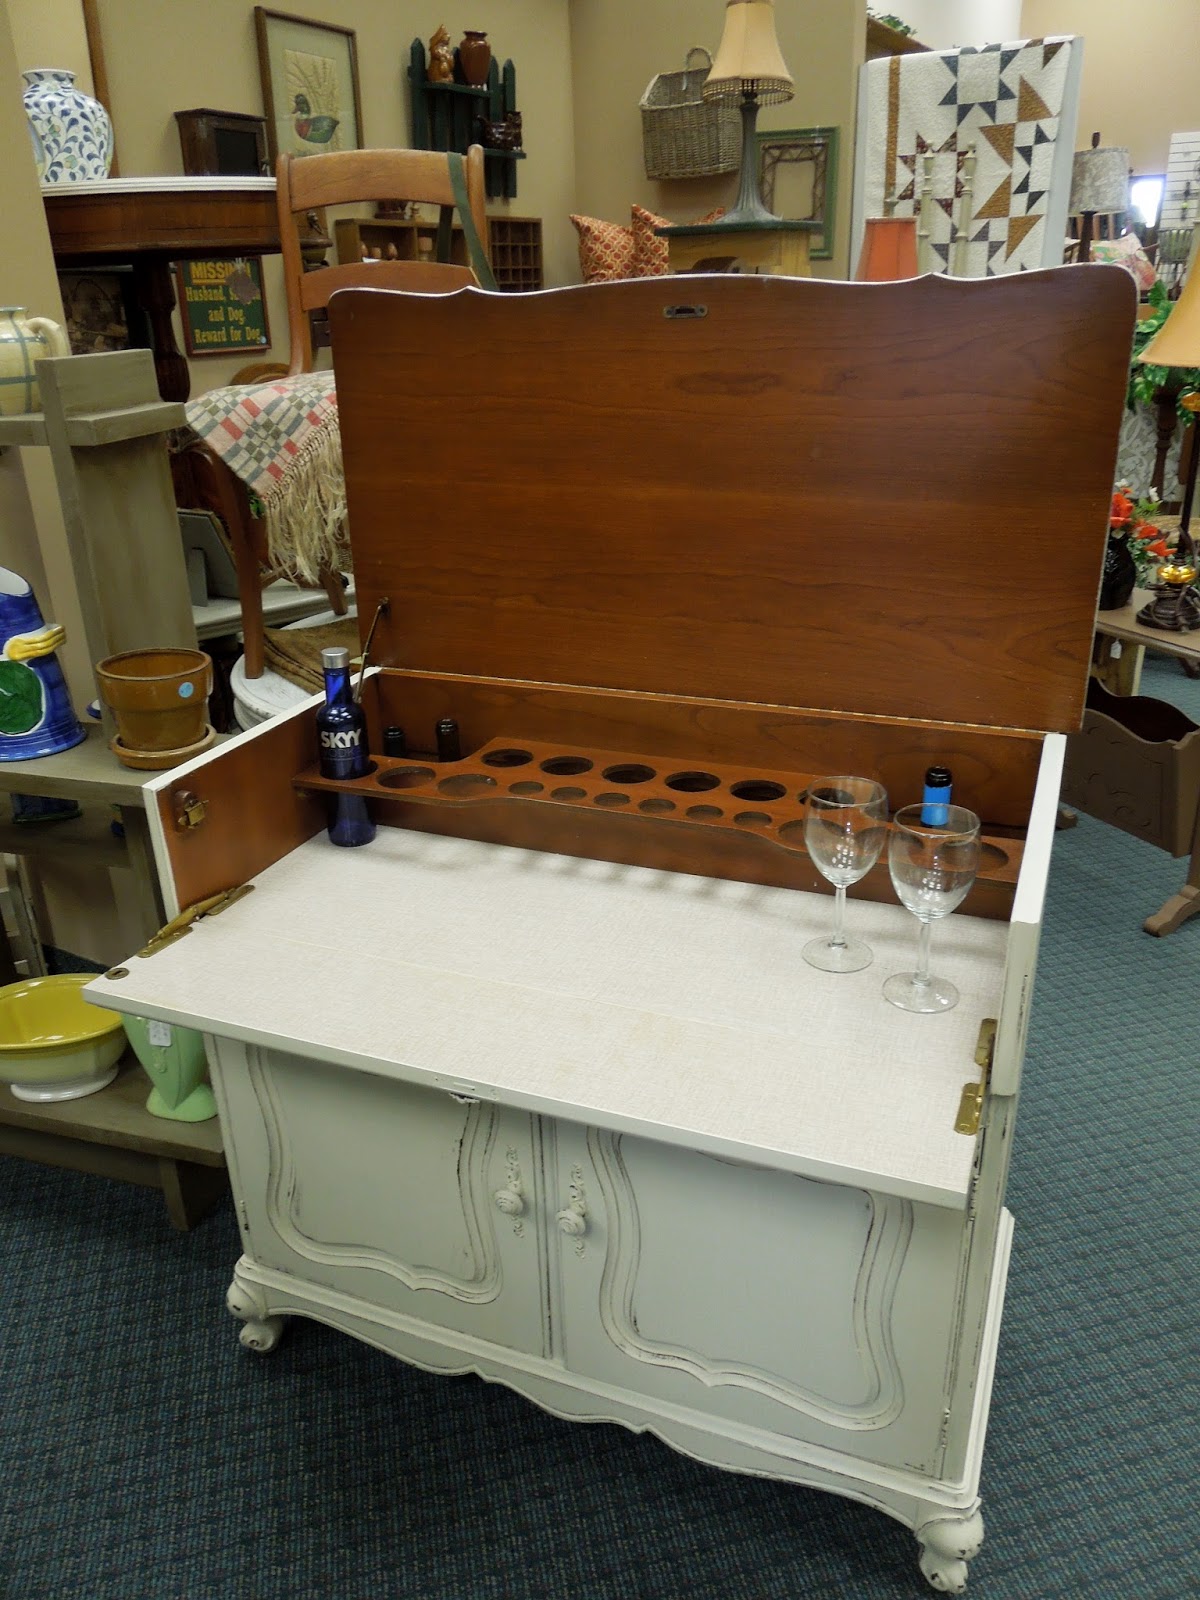
These two projects were done this week. I really like the gray, and since it sold immediately, I'm working on another chest that will be the same color.

This is the before. The handles were missing on the top, so we filled in the original holes and drilled a center hole for knobs. I looked through my miscellaneous hardware and had a few trims and two knobs that looked nice. The brassy look isn't one of my favorites, and with gray it was to bright. Simple to fix, sprayed it a nice rich hammered bronze. The paint is not a full on metallic, it's more like a deep gun metal with specks of bronze in it.
This is the After. The glaze turned the light gray into a more subtle shade and leaving a bit extra glaze on the distressed edges,  really gave it more detail. I think the hardware worked out perfectly, too.
This little chest was done with Valspar Chocolate Milk and Websters Chalk Paint Powder. It started out as a plain wood, nothing exciting. All the hardware was intact, that's a score. I sprayed it the same bronze as the gray chest, to update the look. The distressing and glaze gives depth to the drawers. Its fun to work on these small projects, stress free and can be done in a reasonable amount of time.   

Next weeks projects are already being lined up. I have several Custom pieces to get done, but have a special piece I can't wait to get started on.  I'll post a few pics as I get going.

Keep cool, creative and safe,
Patti

Wednesday, July 8, 2015

A few new pieces

This week was productive, I completed 3 pieces and started a 4th. Nothing really fancy, but fun to work on.

When I found the bookshelf, it had doors on it. The glass was missing and hardware was broken. I thought about replacing the glass or even putting chicken wire in the holes. But in the end, I decided to remove the doors, fill the holes and paint it.  I chose an Antique White for the exterior and a light gray for the interior and knobs.

This black chest was in nice condition, even the faux slate top wasn't damaged. It was just extremely out dated and to be honest, ugly. Usually the hardware can be removed, this wasn't the case. Fortunately, it was all there and in good shape.  I see it as a chest in a man's office or even a chest in a boys room - so black was the color I thought would be best. I did a bit heavier distressing than my normal amount, but it needed it, to give it some detail and character.


I love this small accent table. I'm not sure of it's age, but its an older piece. It was a wonderful find.

Only a bit of damage to the veneer, and I mean a tiny bit. It was easy to just sand it and fill with wood putty. Once again, Antique White paint and distressing.  It's hard not to take this piece home.

The shop is open tomorrow, I have a feeling it's gonna be a busy weekend. I also have a workshop tomorrow night from 6:00 - 9:00 and then an All Day Workshop on Saturday, 10:00 - 4:00.  If nothing else, I'm certainly not bored :)

Til next time, be creative.

Patti


Wednesday, July 1, 2015

It's Cocktail Hour

Last week, when Nancy and I were out looking for new pieces to transform, I found this Bar/Buffet.


I forgot to get a before photo. It was your usual boring brown - no grain wood. The condition was excellent, it was just outdated. In this photo, you see a Buffet.  But wait til you open the top.

It's a Bar.  I love the rack for glasses and side slots for bottles. I only had a few glasses at the shop for display, so I couldn't fill it up correctly. The little holes are for cordial glasses and shot glasses. Larger glasses will easily fit in the larger ones. Now look at this feature....

The front opens up to make a little bar table. The inside is an off white formica. Great for making drinks or putting the Wine Glasses and Bottles on. This piece is unique, its a nice change to have something different from the norm to make over.

I wanted to do it in a fun color, but figured more people would be able to use it in Antique White. As always it has nice detail to distress so I did it a bit heavier than my usual. I gave it more of a worn look.


The handles on the doors were broken, they had a hole in the center for a key.  To fix them, I had Jeff put a knob in the center and it covered up nicely. Little paint over them and slight distressing, instant aging.

When finished,  I gave it a double coat of the Daddy Van's wax on the top, now it's really waterproof and ready for a party.  I think it's time for a Cocktail.

Lets see how long this piece lasts on the floor.

Til the next time... keep on creating.
Patti


Sunday, June 28, 2015

Pretty and Popular

It's been a busy week.  There's custom order pieces to be completed and pieces to put on the floor by opening on Thursday.

 This piece was my "floor" piece for this week.

 It started out with some problems, it was really rough in spot and needed serious help. Jeff did a nice job of filling in scratches and gouges and sanding imperfections. It's amazing how just a bit of wood putty can make such a huge difference in the finished piece.

I was very lucky that all the hardware and detail was intact. I love to work on any pieces that have carving or lots of areas that can be highlighted with dark wax or glaze.

For this piece, I used Valspar Fossil White in a Satin finish (mixed with Websters Chalk Paint Powder), Distressed lightly on the edges and some of the detailing. Then I mixed a Gray paint into Behr Faux Glaze to brush on for a tint and to bring out all the potential of the carving. When totally dry (I waited til the next day) I finished with a coat of Daddy Van's clear wax.

I have to say, I won't be using the Behr Faux Glaze again. It was very hard to get an even finish. From now on, I'll be sticking to Rustoleum - it's so much easier to use and gives such a smooth look.

Here's the completed piece....

There's a reason this blog was titled "Pretty and Popular". We posted a photo of it on  Next Act's Facebook page at 5:00 PM on Wednesday. At 10:00 AM on Thursday the shop opened, it was sold at 10:10.  Then, 5 minutes later another lady came in to buy it - she'd seen it on Facebook too.
 I have to say it surprised me.

 I'm now on the look out for another piece like it - and let the fun begin again!!!


Be creative,
Patti

Saturday, June 20, 2015

French Fixation

There's something about French Provincial that I find interesting. I don't like the shiny finish or the usual colors - whites and yellows trimmed in faux gold.  
BUT... the lines and details are always fun to work with.
I found this piece at a thrift shop. It was in pretty good condition, a few nicks and chips but nothing that would take away from a nice finish.
The details on the drawer and the legs are great for what I had planned. I chose my  paint color, Valspar Pomegranate Seed and a Rustoleum Java Brown Glaze.
Websters Chalk Paint Powder and Daddy Van's Wax.


The detailed carvings hold the glaze and really let them stand out. The same for the drawers and the bottom trim.
The color on the drawer is off in this photo but you can see how the glaze gives the detail a soft outline.
And this is the completed piece.  Quite a pop of color, great accent as a dresser or a buffet.


Now, I'm in search of more of these pieces. 

Thanks for letting me share my work with you.

                                  Have a great week.
                                                                     Patti


Tuesday, June 16, 2015

In Love with Brick Red.

A few weeks ago, I finished a Desk/Hutch. It was done in Brick Red - my new favorite color.
I keep telling Jeff that I'm going to take it home and set up my guest bedroom. Well, today I got the dresser completed.... now I really want to take them home.
This is the before and after of the dresser. It was missing a few knobs and needed some serious TLC. I replaced the knobs, sprayed them a Rubbed Bronze to match the Desk/Hutch and then sanded all the scratches and filled the dents.
Ta-Da, the completed piece. Now I am in serious LOVE with this color. I like warm, cozy colors. Red being my favorite - any shade works for me. I have a feeling this set will sell fast - maybe I should paint my master bedroom set this color.


I'm now on to my next project, I know it's hard to believe, but its a Red Chair!!!!!!

Take Care,
Patti

Monday, June 15, 2015

The Swan makes a debut.

Today, I was able to complete the Ugly Duckling makeover.


Tomorrow, they will go on the floor. My hope is that some little princess will be lucky enough to add this cute set to her bedroom.  The nicest thing about these two pieces, they're not expensive, they're just simple pieces but perfect for a starter set. Our Goal is to keep our prices down, to enable everyone to be able to afford a new piece or complete sets. It's always fun and rewarding to see how quickly my transformed pieces sell.   Lets see how long these two last.

I'm in the process of completing a couple custom orders, then I'll post my next project.

Be Creative...... Patti


Monday, June 8, 2015

Ugly Duckling to Swan???

 For some time now, I've wanted to do a little girls bedroom. Today, while on a "search and rescue" mission with my sister, I found a really cute little 4 drawer chest. It's the perfect size for my project.
 
The best part is that it's in great shape.which makes it so much easier to work on and get nice results.
The hardware is always an issue. So many times you find a piece and it's missing some of the pulls or knobs. This is missing one of the pulls but I wasn't planning on keeping those anyway.


My plan is to use white porcelain knobs, very feminine and perfect with the soft colors I've chosen.


These are the two colors. The pink is called Sweetheart Rose and the white is one I made and had matched. The white matches the knobs perfectly... even though it looks a bit off in the photo.

Plan:  Body of the chest in the White & Drawers in the Pink.  Hopefully, I can find a desk and chair and paint it up to match.

I'll post the progress, hoping the vision in my head will be the end result.


Sunday, June 7, 2015

A few more recent projects.

I enjoy doing hutches. This was fun to do because of the size. The photo shows it as a blue when it's really done in Valspar, Sultry Bay. It's a muted teal-blue. It's been lightly distressed on the edges and waxed to a nice sheen.
Great Country desk/Hutch. If I had a farm style home, I could picture it in the kitchen with cookbooks and jars filled with fun stuff.  I also think it would  be perfect for an office or child's room. This was done in Brick Red by Clark Kennsington. I seem to gravitate to muted shades. Once again a light distressing to give it the worn - cozy feel and then waxed. The nice thing about the wax I use, "Daddy Vans" - it's waterproof. If you spill, just wipe off with a damp cloth and dry. (note: the brassy hardware was sprayed with a rubbed bronze spray, BIG difference in the appearance)

Saturday, June 6, 2015

My Album

I spend my days, reviving and renewing previously loved, well worn pieces of furniture. It's amazing how everything these days is disposable. I look at the piece I'm about to makeover and think of how proud the original owner was when they got it, new and shiny. By the time I get most pieces they are scared from years of love, outdated by todays styles and headed for the land fills.

I take pride in what I do, knowing that someone is going to purchase my work and love it all over again. The furniture gets a second chance and will continue to make someone happy. It's pretty much a win-win for all.

This blog is going to be more of an album for me. I want to share my work with you and make myself a record of all the revivals. I have a few project from awhile ago with before and after photos, some just the completed. My goal is to remember (that's the key) to photograph the pieces before I start and show how each looks with a bit of TLC and some Chalk Paint.

Many of my projects are custom orders and not for sale. I'll post some of those as well, it's always fun to see how different things look with a new color and texture. 


Before 
After 
My Favorite Hutch. It was in perfect condition so working on it was wonderful. 


The photo doesn't do this justice. It's gently distressed and has a real
"Cottage Feel"